I had been running a Windows 2012 R2 demo server on Azure. I’m no longer using it but want to keep an on-premises copy for reference. I tried and failed several ways to download it before finding one that worked.
I had already deleted the Azure VM, keeping the VHD as a blob file. It is theoretically possible to directly download that blob, but my attempts to do that through Azure Storage Explorer and through a direct browser link both failed. Maybe due to inadequate temp space on my C: drive? Regardless, the file is 127GB, even if only 50GB is in use, so at $.085 per GB for bandwidth, it would be over $10 just to download that file.
Load or Attach VHD to Running VM
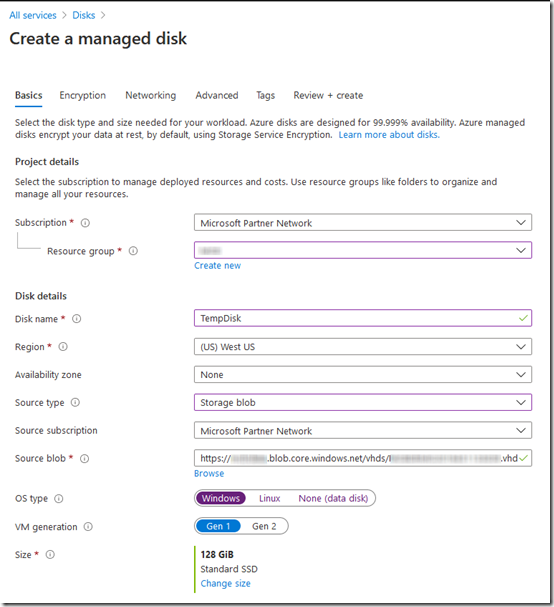
The solution is to get the VHD on Azure back into a running machine. I didn’t want the machine to activate and start running updates etc., so I just spun up a temporary server, then created a new disk with the blob VHD as the source. To create the disk:
All services > Disks > Add > Basics
Resource Group: same as the VHD blob
Source type: Storage blob
Source blob: Browse for the VHD blob
Size: Choose Windows, change to 128GB Standard SSD,
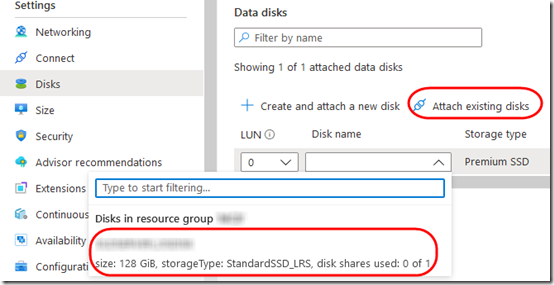
In your temporary VM, go to Disks > Data disks > Attach existing disks and choose the new temporary disk:
Create a File Share and Open in Temporary VM
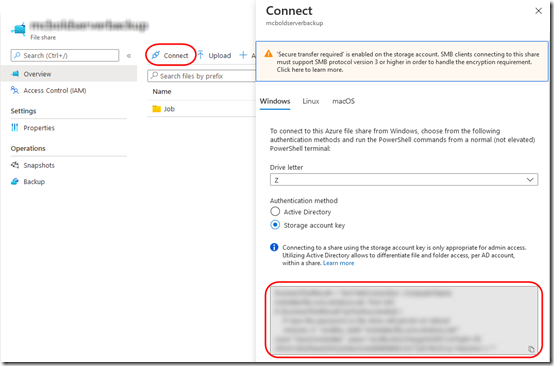
Credit for this idea goes to this post. In an Azure storage account, probably the same one holding your VHD blob, create a File Share. Click on the Connect link and copy the commands from the right pane. Then in the temporary VM, at non-administrative PowerShell prompt, paste in the command. Ignore the PING warning; it should still work as long as port 445 is open. You’ll wind up with a Z: drive mapped to your empty File Share. Brilliant!
Create a “Local” Backup on the File Share
Use a standard tool to create a full-image backup of the secondary drive (the disk you just attached) onto the Z drive. You could probably use Windows Server Backup. I chose to install Veeam Free and use that to create the backup. Create a Veeam restore ISO if you don’t have one already. Veeam would not back up to the mapped Z drive, so I had to tell it to use a shared folder, then extract the username and huge password from the PowerShell command pasted above. The Veeam backup of the 42 GB drive was only 20GB in size.
Download the Backup File
I could not use the PowerShell commands to create a share on my on-premises machine because my Internet provider, AT&T, blocks port 445. Azure documentation tell you to go through various VPN setups, but I found that all I needed was to open Azure File Explorer and download the file from there. Because it was only 20GB, this went fairly quickly on my gigabit connection, and should only cost a couple dollars. Also download the bootable Veeam ISO unless you already have one locally.
Restore the Machine in Hyper-V
1. In your on-premises Hyper-V host, create a new virtual machine with an empty VHDX disk. Do not give it a network adapter if you do not want the machine to go online.
2. You need to be able to access the Windows / Veeam backup files from inside the new machine. You could probably put the backup files on a file share, but I just created a temporary VHDX disk, attached it to another running virtual machine, copied the backup files into the VHDX, detached the disk from that machine, and attached the disk as the secondary disk on my new virtual machine.
3. Do a bare metal restore of the virtual machine. For Windows Server Backup, that would mean booting from a Windows Server installation disk ISO and doing a recovery. For Veeam, that meant booting from the bootable Veeam ISO and restoring from the local disk. In about half an hour, the restore finished, and to my surprise, on reboot, it booted right away. Windows detected that it needed to update drivers and did that automatically.
4. To reduce the size of the VHDX file, follow the advice in this ServerFault answer. From inside the virtual machine, open PowerShell as administrator and run these two commands:
Optimize-Volume -DriveLetter C -Defrag -Verbose
Optimize-Volume -DriveLetter C -ReTrim -Verbose
After that, shut down the virtual machine and compact the VHDX from Hyper-V. The size of the VHDX should be close to the disk space used inside the virtual machine.
5. Start the machine again to make sure everything looks good. Shut it down, then export it from Hyper-V for local archiving.


