Once a year, I test restoring a server to a desktop. The server is backed up with standard Windows Backup. The idea is to confirm that if the server went down, I could quickly restore to one of the customer’s desktops as a temporary solution while the server is repaired or replaced. This is also an interesting test of how well Windows Backup handles restoring to different hardware. Previous tests are blogged in 2011, 2012, 2013, 2014, and 2015.
New This Year
This year we’re restoring to a newer Lenovo M93p (model 10A9). For the first time, the desktop has an SSD drive, in this case 256GB.
This year, I’ll focus not on how long each step took but rather on detailed instructions to follow next time.
What You’ll Need
Gather these tools before you start:
- Server 2012 R2 media (a USB thumb drive is okay if formatted as MBR; see 2015 “Lessons for Next Time”)
- A bare hard drive equal to or greater than the size of the drives backed up from the server. More on this below.
- Media for the desktop OS. In this case, Windows 7 x64 on a USB drive.
- Noise-cancelling headphones if you need to concentrate in a noisy environment.
Prepare for Restore
If the drives backed up on the server exceed the size of the desktop drive, automatic restore won’t work. I’ll explain how to do command-line restore below, but it would be better to bring a larger bare drive along and temporarily install that into the desktop. This should allow automated restore and you won’t have to restore the desktop at the end; you just re-install the desktop’s drive. (In a real disaster scenario, if the reason that the server is dead is due to a hard drive failure, you might be able to use your spare hard drive directly in the server.)
If you will be restoring over the actual desktop’s drive, make sure you have a full backup of all partitions you need to restore the drive. I’m relying on Server 2012 R2 Essentials client backup for this.
For reference, run Disk Management (diskmgmt.msc) on both the live server and the desktop and take screen shots. This info can be helpful later for re-creating partitions.
Restore to the Desktop
1. Insert the bootable Server 2012 R2 media (DVD or thumb drive).
2. Plug in the external backup drive from which you’ll be restoring. If it’s USB3, use a USB3 port if available.
3. Boot desktop from Server 2012 R2 media. Press F12 during boot to get boot menu. This desktop still has its BIOS is legacy mode, not UEFI, so when booting from the USB thumb drive, choose Legacy version, not UEFI.
4. Choose Repair your computer > Troubleshoot > Command Prompt. Unlock the external BitLocker drive if prompted, even though you don’t need it right now.
5. Use these commands to clear the internal disk:
diskpart (determine which disk number is the internal drive)
list disk
sel disk 0 (choose the drive you want to clear, not the backup source drive!)
clean

exit
6. Type exit again to exit the command prompt, then go back to Troubleshoot > System Image Recovery. Unlock the BitLocker drive if you haven’t already. Accept the defaults to restore from the main system image on the disk. Allow it to partition the target disk. Restore all drives, not just the system drives.
7. Click the Exclude disks… button. On the Re-image Your Computer dialog, exclude the thumb drive. Only allow it to repartition the built-in SSD.
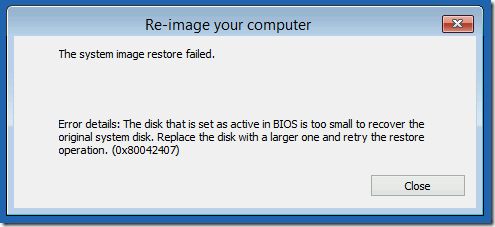
This is where I got error 0x80042407 telling me that I couldn’t restore to a smaller drive:

I tried again choosing Only restore system drives but got the same error.
If automated restore worked for you, skip down to “Prepare to Boot.”
Command-Line Restore
During this test, I didn’t have a larger bare drive available, though I did have a 1TB external USB drive. After reviewing this TechNet article, I understood that my alternative was to use the wbadmin command-line to restore the System Reserved and C: drives to the SSD and use the external USB for the D: drive.
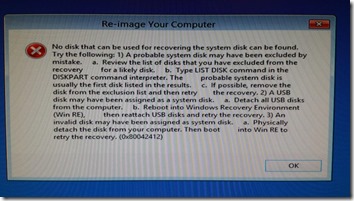
As an aside, I later tested an automated restore of all partitions to the external USB drive, but that failed with a long message saying, among other things, that you can’t restore a system partition to an external USB drive:
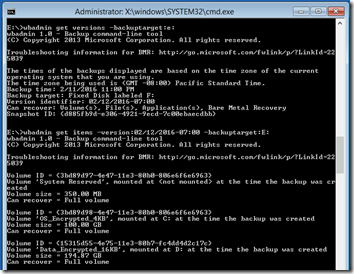
Follow the steps above to get to a command prompt. In this case, the external USB drive holding the backup we want to restore is on drive E:. We’re restoring the last backup from February 12.
Note that wbadmin parameter names are preceded by hyphens. Even where a command breaks across two lines below, type it on one line.
Get backup version, then item details, from target:
wbadmin get versions -backuptarget:E:
wbadmin get items -version:02/12/2016-07:00 -backuptarget:E:
Recreate the first two volumes listed as “items” (ignore Applications and Components). In this case, we want a 350MB System Reserved partition and a 100GB C: partition:
diskpart (temporary letter so we can target during recovery)
list disk
select disk 0
create par primary size=350
format fs=ntfs quick label="System Reserved"
assign letter=B
active (note that we make System Reserved the Active partition)(that’s 100GB)
create par primary size=102400
format fs=ntfs quick label="OS_Encrypted_4KB"

assign letter=C

detail disk

exit
Restore the System Reserved and C: volumes. System Reserved doesn’t have a drive letter on the backup media, so you must use the peculiar volume ID syntax. The ID itself comes from the wbadmin get items command above, but be sure to preface it with \\?\Volume and add a trailing backslash:
wbadmin start recovery -version:02/12/2016-07:00 -backuptarget:E: -itemType:Volume -items:\\?\Volume{3bd89d97-4e47-11e3-80b0-806e6f6e6963}\ -recoverytarget:B:
diskpart (remove temporary drive letter from System Reserved partition)
list disk
select disk 0
select par 1
remove letter=Bdetail disk
exit
wbadmin start recovery –version:02/12/2016-07:00 -backuptarget:E -itemType:Volume –items:C: -recoverytarget:C:
Prepare to Boot
What, you thought you could just boot the computer now? Take a deep breath; we’re about half done.
Now that the OS has been restored to the desktop, we want to boot to the 2012 R2 OS and then restore the data drive from inside Windows.
Before we do, some important preparation tasks to tell the network that the server is now on the desktop:
1. Shut down the live server.
2. On the router, change the server’s IP reservation to a temporary IP, e.g. one ending in .99. Change the desktop’s IP reservation to the server’s, in this case ending in .2.
3. On the router, delete the server’s and desktop’s old DHCP leases. You might want to just restart the router to make sure old routing tables are cleared.
Startup Repair
The desktop fails to boot. We need to do a startup repair, but there is no such option in the 2012 R2 repair environment. Or is there?
Thanks to this helpful article, I found that we can run startup repair from the command line. While still booted to the 2012 R2 recovery media, follow the steps above to get to a command prompt. If you’ve rebooted, you can choose Skip this drive when asked to unlock BitLocker on the external drive.
X:

cd \sources\recovery

startrep
“Attempting repairs” takes several minutes. When it finishes, you’ll be back at the command prompt. Exit that, then choose Continue to start the operating system. The system will restart and hopefully Windows will come up with the C: drive running from the desktop’s SSD.
Logon and Fixing the Network Adapter
The first boot will take a while on “Getting devices ready” as Windows re-assigns hardware etc. Of particular importance is the new network adapter—the OS no longer sees the server’s network adapter so the static IP assigned there is not active.
Log on and go to View Network Connections (or ncpa.cpl). Assign the same static IPv4 address as was used by the live server. As a domain controller, the sole DNS entry should also be the local static IP. When setting the static IP, remember to set the gateway to point to the router. A message appears that another adapter which is no longer present in the computer has that address. Click Yes to remove he static IP configuration for the absent adapter.
Restore Data Drives
1. Plug in the blank external USB drive.
2. Use Disk Management (diskmgmt.msc) to create data partitions on the blank external USB drive that are at least as big as the original partitions. You can find the size of the original partitions from the screen shot you took of the server drives or from the output of wbadmin get items as explained above. Assign drive letters matching the original system.
3. In Device Manager, expand Disk drives, right-click the blank external USB drive, and choose Properties. On the Policies tab, set Removal policy to Better performance. Restart if requested. This will make the restore go faster.
4. Consider turning on BitLocker on the external drive’s partitions. This might slow down the restore a bit, but if you don’t, you’ll have to do a secure wipe later, after testing is complete.
5. Use the Windows Backup UI to restore the data drive(s) from the external backup drive to the blank external drive.
6. If you have data that is backed up directly, for example using RoboCopy, restore that data by copying from one external drive to the other.
7. Reboot the system. This should go more quickly as the system is now happy to have all its drives back and its network card properly configured.
You can disconnect the backup drive but remember that you are now running with data off the formerly-blank external USB drive so leave it connected.
Test the System
1. Check Event Viewer > Administrative Events.
2. Check that the web server works. (May need to test from outside network using a remote connection to another site.)
3. Check that Active directory works, including accepting a logon from a client and updating group policy (gpupdate /force).
4. Check that shared drives are available from a client. Try opening files on a network share.
5. Print a page to a network printer shared via the server.
6. If you’re running the Essentials edition, review the Critical Errors in the Essentials dashboard. Under Health Monitoring Tasks, choose Refresh. The remaining errors indicate that some hard drives are not connected and that the Client Computer Backup service is not running. These errors are expected.
7. Run and review the Essentials Health Report. This also sends an email, testing outbound email flow.
8. In Computer Properties, check that Windows shows as activated.
Testing is now complete. In a true disaster recovery scenario, users could resume work now.
Re-Activate Live Server
1. Shut down the test server running on the desktop.
2. Reverse the changes you made in the router: set the desktop’s MAC address to point to the desktop’s IP and the server’s MAC to point to the server’s IP. Delete the current DHCP leases for both (if the server has vPro, even though it has been off, it will have pulled an IP address).
3. Turn on the live server.
Restore Desktop OS
If you did your restore to a temporary drive, just swap back in the desktop’s real drive and you should be good to go. (The temporary drive now contains unencrypted server data. Be sure to do a secure wipe of the drive.)
If you used the desktop’s real drive, and you use Server Essentials 2012 R2 client backup, follow these steps to restore:
1. Start the desktop. Press F12 during boot and choose to boot from the network. When the network media is found, press the requested key to complete the network boot.
2. Follow the wizard to restore from the backup stored on the live server to the desktop. Choose “Let the wizard fully restore.” You’ll still get a screen asking you to confirm restore of SYSTEM_DRV, Windos7_OS and Lenovo_Recovery. The original estimate for the restore was 32 minutes but it took 50 minutes.
3. Reboot. Error 0xc00000e appeared: “The boot selection failed because a required device is inaccessible.”
4. Insert the desktop OS media (in this case, Windows 7 x64 on a USB thumb drive) and boot from it. Follow the steps to do a startup repair.
5. Reboot. This time, the desktop OS started correctly.
If you used an external USB as a temporary data drive but did not encrypt it with BitLocker, it now contains unencrypted server data. Be sure to do a secure wipe of the drive.
A Note on vPro Remote KVM
One of the reasons I chose this Lenovo M93p desktop is that it allows out-of-band remote control using Intel’s AMT vPro technology. I blogged about this setup here.
I left the customer site while the client restore was running, and when I got back to my office, I was able to connect to the machine using the Intel Manageability Commander Tool, start the remote VNC Viewer, and watch the desktop restore complete. So far so good.
However, after the reboot, I saw the 0xc00000e error, but soon I was no longer able to connect remotely to the machine. It was not even responding to ping. It was like AMT it was no longer pulling an IP address for the machine. I had to go back on site to insert the Windows 7 media and do the startup repair. This is disappointing as this is exactly what the out-of-band functionality is supposed to allow—remote control and even remote media when the machine is not booted to an operating system.
Once I completed the startup repair, AMT remote KVM started working again.


