Time for my annual test of restoring a server to a desktop. This year is almost identical to last year, but I want to have one list of steps, so I’ll repeat much of that text.
I’m restoring Server 2012 R2 Essentials (installed on a Lenovo TS140 with legacy BIOS) to a Lenovo M93p desktop. The server is no longer running a mail server, so that simplifies things a bit.
1:05pm Arrive on site. Prepare for test. Capture a screen shot of desktop’s disk layout for future reference. Connect to Essentials dashboard on server to confirm that all desktop partitions are included in server backup. (I don’t have a local backup this year, so I’ll be relying on the Essentials backup.) Check that desktop disk will accommodate server’s disk—it will be tight; both are 500GB raw.
1:25pm Boot from thumb drive containing Server 2012 R2 Essentials media. This is new this year—I used a DVD last year.
From last year, I know that I need to choose Repair your computer, then Troubleshoot, then Command Prompt. Unlock the external BitLocker drive if prompted, even though you don’t need it right now. Then use these commands to clear the internal disk:
diskpart (determine which disk number is the internal drive)
list disksel disk 0 (choose the drive you want to clear, not the backup source drive!) clean
exit
Type exit again to exit the command prompt, then go back to Troubleshoot, System Image Recovery. Unlock the BitLocker drive if you haven’t already. Accept the defaults to restore from the main system image on the disk. Allow it to partition the target disk. Restore all drives.
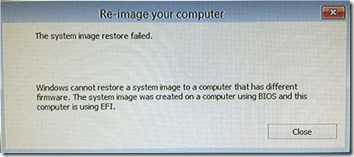
1:40pm I immediately got the following error: “Windows cannot restorre a system image to a comptuer that has different firmware. The system image was created on a computer using BIOS and the computer is using EFI.”
The USB key offered both legacy and UEFI mode for booting, but both gave that message. Both the server and the desktop are using legacy BIOS. So this must be an issue with the GPT disk format on the USB key itself. See “Lessons for Next Time” at the end of this post.
(At this point I spent 17 minutes on unrelated phone call.)
2:05pm Decided to go back to using a DVD. Booted from DVD. Restore started without problems.
2:09pm Started restoring drive C:.
2:14pm Started restoring drive D:.
2:23pm Restore complete.
Turn off live server. In router, assign temporary IP to server’s MAC, assign server’s IP to desktop’s MAC, and delete desktop’s old DHCP lease. Disconnect backup drive from desktop, remove DVD, and reboot.
2:25pm Boot desktop as server. “Getting devices ready” takes a long time.
2:35pm Logon prompt. Sluggish response. Emails from monitoring software indicate several services failed, probably because DNS is pointing to external servers.
2:41pm Finish changing local adapter to fixed IP and DNS pointing to sever IP. Received emails confirming that some failed services are now running. Start working through tests:
a. Check Event Viewer > Administrative Events.
b. Check that the web server works. (May need to test from outside network.)
c. Check that Active directory works, including accepting a logon from a client and updating group policy (gpupdate /force).
d. Check that shared drives are available from a client. Try opening files on a network share.
e. Print a page to a network printer shared via the server.
f. Review the Critical Errors in the Essentials dashboard. Under Health Monitoring Tasks, choose Refresh. The remaining errors indicate that some hard drives are not connected and that the Computer Backup service is not running. These errors are expected.
g. Run and review the Essentials Health Report. This also sends an email, testing outbound email flow.
2:48pm Web server apparently offline. Reboot the “server” (desktop) to make sure all services start now that DNS is properly configured.
2:51pm Logon prompt. Web server still not responding. Just noticed that I have no Internet connection. Ah, looks like I forgot to give the NIC a gateway. Now web server works.
3:06pm Testing of clients, etc. completed. In a true disaster recovery scenario, users could resume work now, though there would be additional work on the server setting up backup drives if this server would have to function long-term.
By the way, This PC > Properties confirms that “Windows is activated” even though we have restored to dissimilar hardware.
3:10pm Shut down the desktop. On the router, delete DHCP leases and set the DHCP reservations back to the correct address. Turn on the live server.
3:12pm Before restoring the desktop, I’d like to create a bootable USB key on the live server and test starting a restore on the desktop. This takes a while because I first have to create an .iso from the install DVD, then use Rufus to create a thumb drive, this time making sure it is formatted as “MBR partition scheme for BIOS or UEFI computers”.
4:08pm Test restoring from updated USB drive. Restore started without issues. Cancelled.
Time to restore the desktop’s backup to the desktop. This time I’m restoring over the network from the Essentials server. Note that this requires that you have already Set Up Client Restore on Server 2012 R2 Essentials.
4:15pm Attempt to start desktop from network. Network not available from list of devices. Modify BIOS to add the network card to the list of boot devices, then boot from network.
During the restore prompt choose I will select the volumes to restore (advanced). On the next page, you’ll see that it is trying to restore volumes based on the server’s partition scheme. Click Run Disk Manager (advanced) and delete all partitions on the drive. Click Back and choose Let the wizard fully restore the computer. (Maybe this could have been selected initially but now I know that it is creating volumes from scratch.)
4:25pm Desktop restore started. The initial estimate of 25 minutes expanded to 1 hour and 35 minutes. This desktop has Intel AMT 9 (vPro) which means I can access the desktop even when no OS is installed (setup instructions). I double-checked that that is working and headed out.
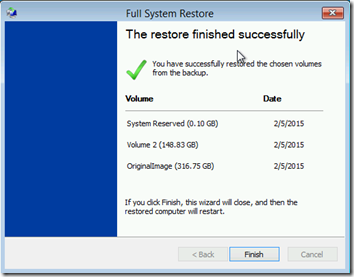
6:00pm By the time I checked on this, the restore had completed but the desktop did not automatically reboot; it just finished and displayed this screen:
After rebooting, I was able to log on to the desktop normally.
Lessons for Next Time
If you must use a bootable USB thumb drive, make sure it is formatted as MBR if the machine you are restoring uses a legacy BIOS. Note that just testing the boot-ability of the USB drive is not enough: a GPT drive will boot and let you do some stuff, but it will fail to do an image restore. Considering how infrequently you are likely to need to do this, it’s probably more foolproof to just use a DVD, which seems to work for both legacy and UEFI BIOS environments.


Pingback: Restore Server 2012 R2 to a ThinkCentre M93p Desktop, Take 3 | MCB Systems