Yesterday I was trying to set up Office 365 to relay email messages from Line-of-Business applications. I was following the smart-host method described in Microsoft KB2600912: How to set up an SMTP relay in Office 365. However that article was missing some key pieces of information.
Credit: This article pointed out the certificate requirement. It also has screen helpful shots to follow, not just text.
Update October 9, 2014: The Microsoft KB article has been removed, but the blog article is still there.
Check the Event Log
As you are configuring the SMTP Server in IIS6, go to Event Viewer and filter the System log on Source smtpsvc. You’ll see some valuable information about your configuration changes.
Check for a Certificate
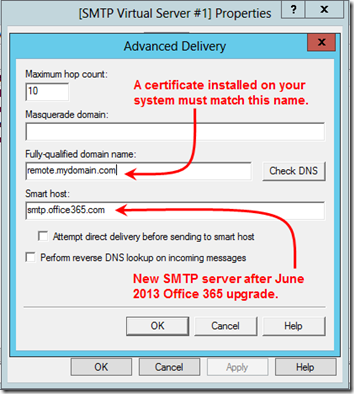
Office 365 requires TLS. In order for TLS to work, your server must have a certificate installed. I discovered through trial and error that the SMTP service chooses a certificate based on the Fully-qualified domain name that you enter under Delivery > Advanced:
If, after making your changes, you see this message in the event viewer, you’re good to go:
Log Name: System
Source:        smtpsvc

Event
ID: 2000
Level: Information
Description: A TLS server certificate was found for SMTP virtualserver instance '1' with thumbprint <guid>. TLS will be available for this virtual-server.
However if you see this message, you need to install a certificate or choose a different fully-qualified domain name:
Log Name: System

Source:        smtpsvc

Event
ID: 2001
Level: Information
Description: No usable TLS server certificate for SMTP virtualserver instance '1' could be found. TLS will be disabled for this virtual-server.
Note that both are Information events; there is no warning that TLS won’t work.
You can view your server certificates under the Internet Information Services (IIS) Manager. (That is, open the “real” IIS, probably 7.5 or later, not the IIS 6 used for the SMTP service.) Select the local machine and click on Server Certificates in the middle pane. The SMTP Fully-qualified domain name should match one of the IIS Issued To names. (It should also work if it matches a Subject Alternative Name in a certificate’s Details tab.) In the right panel, you have the option to Create Self-Signed Certificate. I didn’t try that since I already had an SSL certificate from a public authority installed.
Update October 9, 2014: Your server probably has a self-signed certificate in the format ServerName.MyDomain.local, which the SMTP service will suggest by default as the Fully-qualified domain name. This seems to be is “good enough” for TLS—it doesn’t require that the certificate come from a trusted authority. Try it with that name. If it works, it’s probably easier to just use that name, plus it’s good for 40 years.
As an aside, note that the Smart host in the above screen shot has changed with the big 2013 Office 365 upgrade. The KB article explains how to check your current SMTP server in OWA.
Enable SMTP Logging
If after doing all this, your messages are not going out (they’re piling up in the C:\inetpub\mailroot\Queue folder), you’ll want to check the SMTP logs.
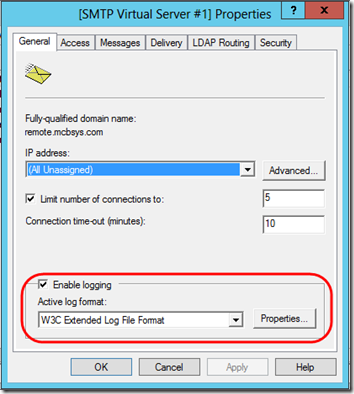
Turning on logging is pretty familiar if you’ve set up IIS logging before. In the SMTP Virtual Server’s Properties, check Enable logging and choose W3C Extended Log File Format:
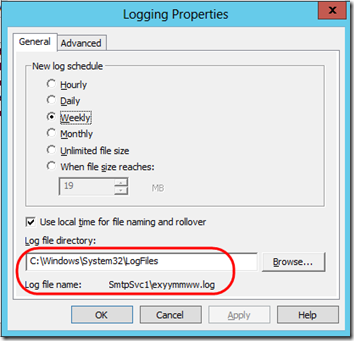
Click the Properties button, and you can adjust logging options. You can also see where the log is stored and what its name is:
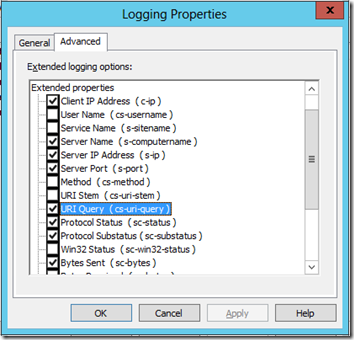
The real “trick” is the Advanced tab. You might think that logging Protocol status (sc-status) would give you the SMTP status codes as messages are delivered. I was seeing the 250 and 240 codes as the server accepted a message for forwarding, but then just 0s as it tried to send it to one of the smtp.office365.com IPs:
#Fields: date time c-ip s-computername s-ip s-port sc-status sc-byte

2013-06-13 02:35:03 192.168.1.2 MYSERVER1 192.168.1.2 0 250 44

2013-06-13
02:35:03 192.168.1.2 MYSERVER1 192.168.1.2 0 250 41
2013-06-13 02:35:03192.168.1.2 MYSERVER1 192.168.1.2 0 250 29
2013-06-13 02:35:03 192.168.1.2MYSERVER1 192.168.1.2 0 250 127
2013-06-13 02:35:03 192.168.1.2 MYSERVER1192.168.1.2 0 240 66
2013-06-13 02:35:03 157.56.235.6 MYSERVER1 - 0 0108
2013-06-13 02:35:03 157.56.235.6 MYSERVER1 - 0 0 4
2013-06-13 02:35:03157.56.235.6 MYSERVER1 - 0 0 59
2013-06-13 02:35:03 157.56.235.6 MYSERVER1 -0 0 8
It turns out that responses from other servers are reported in the URI Query (cs-uri-query) field:
With that checked, I was able to see the actual return codes and messages:
2013-06-13 02:56:54 157.56.106.134 MYSERVER1 - 0 - 220+BN1PR07CA015.outlook.office365.com+Microsoft+ESMTP+MAIL+Service+ready+at+Thu,+13+Jun+2013+02:56:53++0000 0 108

2013-06-13 02:56:54 157.56.106.134 MYSERVER1 - 0 - remote.mydomain.com 0 4

2013-06-13 02:56:54 157.56.106.134 MYSERVER1 - 0 - 250-BN1PR07CA015.outlook.office365.com+Hello+[75.60.89.173] 0 59

2013-06-13 02:56:54 157.56.106.134 MYSERVER1 - 0 - - 0 8

2013-06-13 02:56:54 157.56.106.134 MYSERVER1 - 0 - 220+2.0.0+SMTP+server+ready 0 27

2013-06-13 02:56:54 157.56.106.134 MYSERVER1 - 0 - remote.mydomain.com 0 4

2013-06-13 02:56:54 157.56.106.134 MYSERVER1 - 0 - 250-BN1PR07CA015.outlook.office365.com+Hello+[75.60.89.173] 0 59

2013-06-13 02:56:54 157.56.106.134 MYSERVER1 - 0 - - 0 4

2013-06-13 02:56:54 157.56.106.134 MYSERVER1 - 0 - 334+UGFabzc3dvcmQ6 0 16

2013-06-13 02:57:00 157.56.106.134 MYSERVER1 - 0 - 535+5.7.3+Authentication+unsuccessful 0 37
The last line is the key: “Authentication+unsuccessful”. Once I knew that was the issue, I re-checked the Delivery > Outbound Security dialog and quickly saw the problem. With that corrected, my Queue started emptying and messages were delivered.


