After the Go Daddy DNS meltdown earlier this month, and since they do not allow secondary DNS unless you pay them, I’m experimenting with using DNS Made Easy for my primary DNS and BuddyNS for my secondary DNS. (At $30 yearly, a 10-domain DNS Made Easy account is less expensive than adding Go Daddy’s Premium DNS for $36/year.)
DNS Made Easy has lots of name servers hidden behind their six name server IP addresses, but even they can be affected by a DDoS attack (as there were in 2010). Theoretically, by using two DNS providers, if one goes down, at least half of the DNS queries to my domain will still be resolved by the other provider.
Here are a few notes on how to set that up. You have to make changes at DNS Made Easy, BuddyNS, and your registrar.
Important These instructions assume that you have fully configured your zone at DNS Made Easy using their default name servers. Your A record points to your web server, your MX records point to your mail server, etc. They further assume that you have not yet activated the configuration at your registrar. The last step below tells you how to make your new primary + secondary zones live by changing the list of DNS servers at your registrar. Don’t do this unless you are certain that your entire zone is configured correctly at DNS Made Easy! See this post for an important tip if you are moving Go Daddy DNS records to DNS Made Easy.
DNS Made Easy
There are two one-time, system-wide configurations to make at DNS Made Easy, then you can configure any zone to use those configurations.
Configure Authorized Secondaries
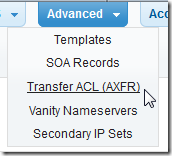
Give DNS Made Easy the list of IP addresses from which BuddyNS will be requesting transfers. (I had to extract these two IPs from instructions here.) Call this AXFR ACL list “BuddyNS”.
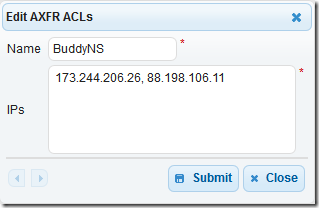
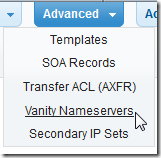
Configure Vanity NS
For now I’m going to use 3 DNS Made Easy and 3 BuddyNS name servers. If your registrar supports it, you could use all six DNS Made Easy servers and all five BuddyNS servers, but eleven DNS servers seems like overkill. DNS Made Easy calls this a “Vanity NS Config” even though we’re not giving the DNS servers vanity names. You set up this custom list once and use it in any domain.
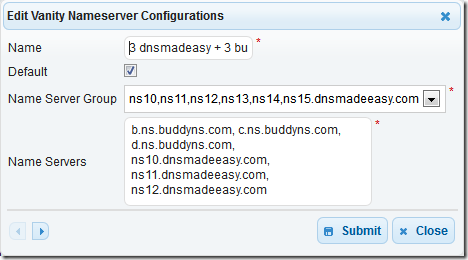
I had previously set up a test domain in DNS Made Easy. I extracted its first three dnsmadeasy.com name servers from the default configuration, then I added the first three from the BuddyNS name server list. I named this configuration “3 dnsmadeasy + 3 buddyns” and set it to be the default for future domains.
Don’t be confused by the Name Server Group setting. That’s just the list of DNS Made Easy servers you could use. In my case there is only one choice in the drop-down; I didn’t change it.
The completed configuration is listed as a non-public Vanity Nameserver:
Configure Zone
Go into the DNS Made Easy zone editing panel for the zone you want to change. On the Settings tab, select your new Vanity NS Config and Zone Transfer (AXFR ACL), then click on Save:
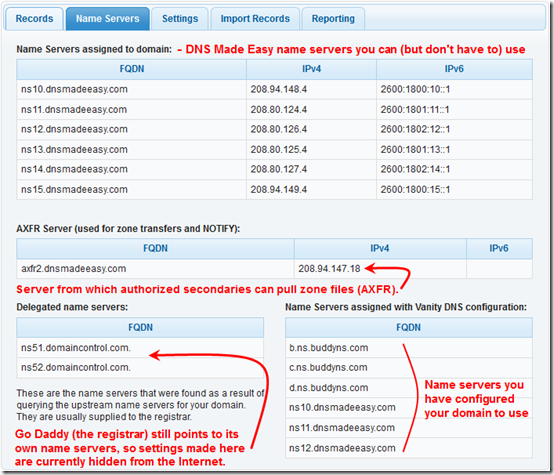
When you click on the Name Servers tab, you’ll see a summary of name servers you could use and name servers you are using. Note that the registrar (Go Daddy in my case) has not been updated yet, so all these settings are hidden from the Internet.
Make a note of the IP shown under AXFR Server. You’ll need that to configure BuddyNS.
BuddyNS
The BuddyNS user interface is a bit odd. There is no Sign Up or Sign In link. When you first go to www.buddyns.com, click on Activate now to set up an account:
Once you have an account, in the upper right corner, click on BUDDYBOARD to sign in and manage your account and zones:
After signing in, to add a zone, click on the ACCOUNT tab:
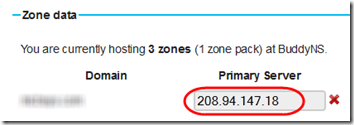
In the lower left corner, add your zone and specify the IP address of the zone’s AXFR Server from the DNS Made Easy Name Servers screen (above):
Update Name Servers at Your Registrar
Now that your primary and secondary DNS servers are set up, you’re ready to tell the world about them, so you need to update the name servers at your registrar.
Warning Don’t do this unless you are certain that your entire zone (not just the name servers) is configured correctly at DNS Made Easy! You can test this by using NSLOOKUP (Windows) or dig (Unix), temporarily setting the name server to be one of your DNS Made Easy name servers, then looking for the records you expect to be there (A, MX, etc.).
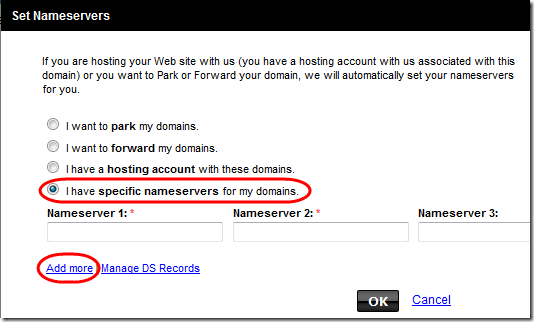
If you’re using Go Daddy, go to the Domain Management Console, check the domains you want to update, click on Nameservers > Set Nameservers, tell it you have specific nameservers, and click the Add more link (since you have more than four):
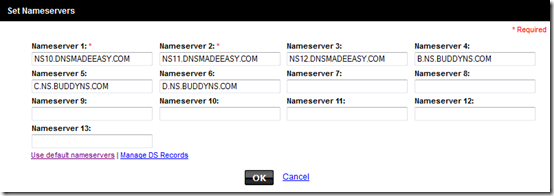
Type in the nameservers from the list you set up in the DNS Made Easy Vanity NS:
Confirmation
Once your name servers start replicating (took maybe 10 minutes when I did it), the DNS Made Easy Name Servers tab will show that the Delegated name servers and the Vanity DNS configuration match:
Back at BuddyNS, click on the Zones tab and select the zone:
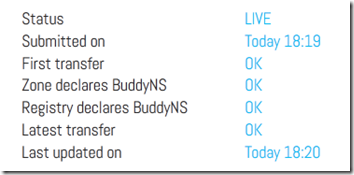
It should show that transfers are working and registrations are updated:




Pingback: Go Daddy: Secondary DNS Should be Free | MCB Systems
One would never use buddyns, and here’s why:
– They’ve invented so-called ‘Vanity DNS’ and choose to take money for it. There is no such thing exists in case of secondary DNS. One can always point some subdomain to the IP of a secondary NS and set it as NS server for the domain, at wish. But with buddyns you can’t! They keep track whether you do such thing and if you do, *they freeze service of your zone and force you to pay for an advanced membership just of that*
– This is the *first service having traffic quota for DNS service i’ve seen*. Need more? Pay more…
– Having a large SOA Expire value and thinking it will help in case of very long master NS unavailability? This ‘ll not help in case of buddyns. *Your zone will live on their secondaries no more than month*.
– They choose to stagnate, offering just the pretty inferior DNS hosting. *How one may sure that they will not die next day*?
Make your choice. I’ve made a proper one: buddyns is not my buddy anymore!
dukzcry – I’ll publish your comment but I’ve removed your URL because WebSense reports it as “potentially damaging.” Check it on http://csi.websense.com/ if you are interested.
@mark Thanks for documenting this, we are taking inspiration from this for to document BuddyNS with DNSMadeEasy on our setup instruction page.
@dukzcry You scattered this post verbatim everywhere around the Internet, and there’s a number of inaccuracies in it. Please check up our response on http://forums.whirlpool.net.au/forum-replies.cfm?t=1920703 . Feel free to respond there.
Thanks for this guide, I was getting nowhere with DNSMadeEasy’s support, they did not get what I was asking…
Great tutorial…saved me a lot of time! In the end, though, BuddyNS wouldn’t update until I set up a custom SOA Record in DNS Made Easy (under the Advanced menu). DNS Made Easy’s default time stamp was in 2008, so I changed it to 2005040501 (ie YYYYMMDD01), a number greater than what BuddyNS currently had. Then BuddyNS refreshed. This step could be added to the tutorial.
Hi Sam, thanks for the suggestion. Strange, I didn’t have to do that. Do you by chance mean you used a timestamp in 2015, e.g. 2015040501?